This article originally appeared in Cymbidium Chatter – Issue 31 (Vol. 2 No. 3): June 2021
Supplied by Joshua White from the Cymbidium Orchid Society of Victoria
The full copy of this Cymbidium Chatter issue can be found here
The Parts of a Cymbidium Flower
With the main flowering season for the southern hemisphere kicking into gear, it seems like a good time to cover the process of making Cymbidium crosses. This is something almost any grower can do and affords the opportunity for learning, making something new and having a bit of fun along the way.
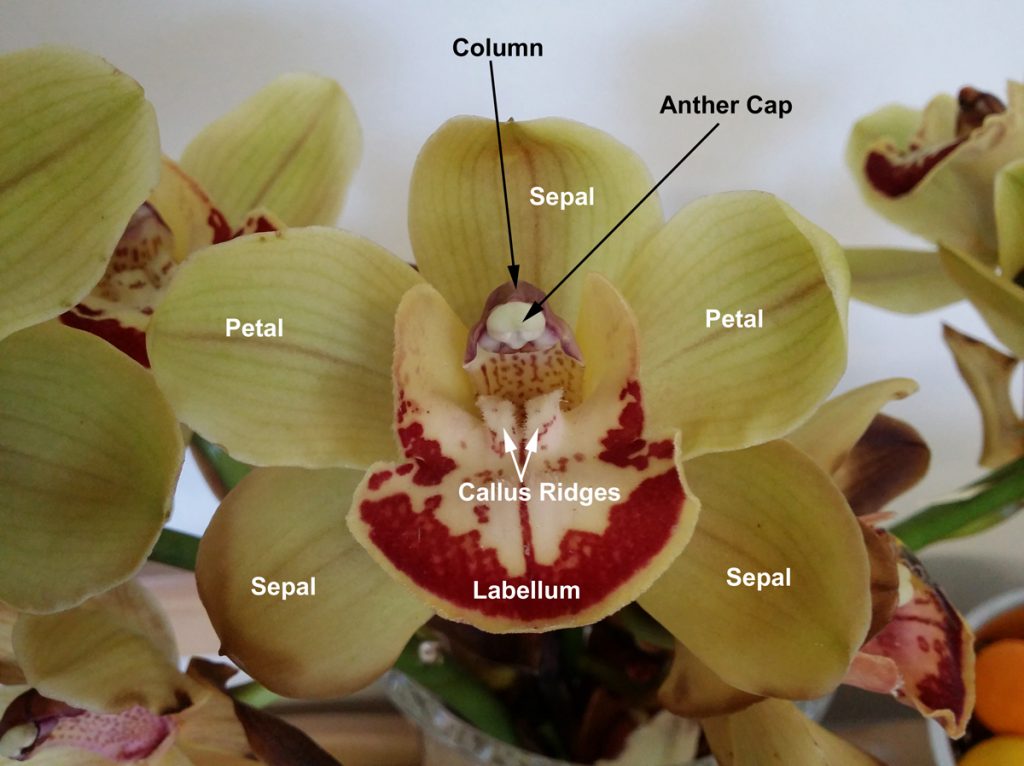
Cymbidiums, like most orchids, are hermaphroditic – the flowers have both the male and female reproductive structures (an exception to this is Catasetinae). These are found on the column, the central structure opposite the lip (the labellum).
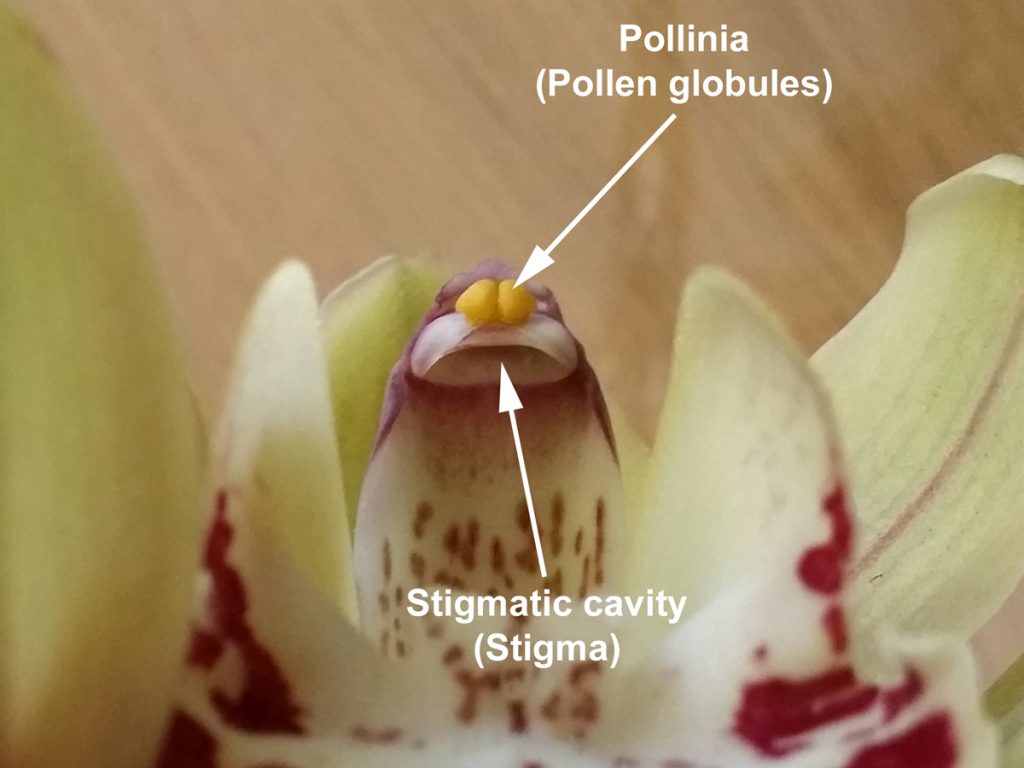
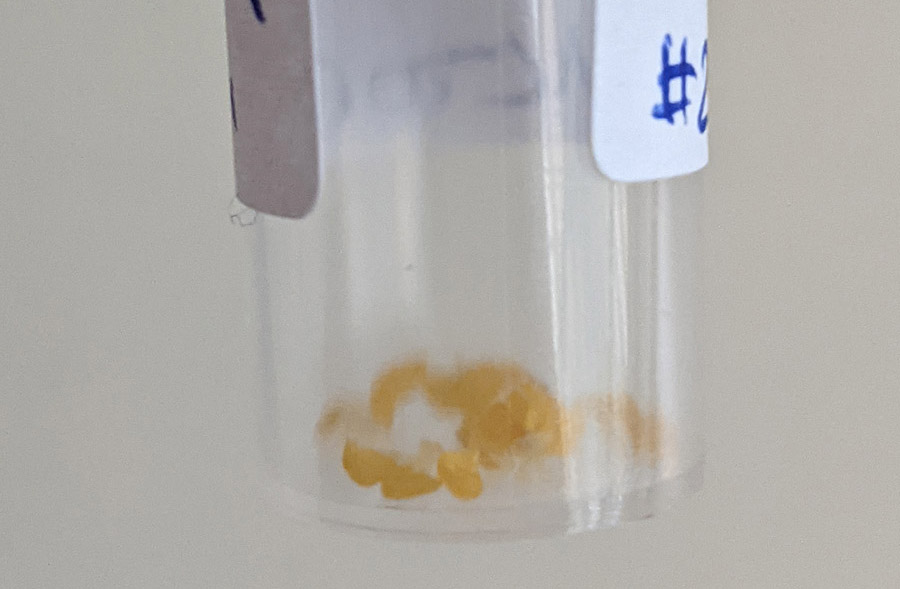
At the end of the column is the anther cap, which protects the pollen. Once the anther cap has been disturbed or removed (see photo), the flower usually starts to collapse. The pollen is in the form of two globules known as pollinia; each pollinium is a waxy mass of pollen grains. Depending on the size of the flower, these can be smaller than a pin head! Most intermediate and standard hybrids have large pollinia that are easy to handle with a pair of tweezers, however. Viable pollinia are typically green or yellow in colour, whereas grey or brown pollinia may not be.
Behind the pollen, facing towards the back of the column, is the stigmatic cavity. This is the female part of the flower and where pollinia must be placed for fertilisation to occur.
The plant that provides the pollen is called the pollen parent, whilst the plant that holds the seed pod is called the pod parent. The cross of the two is always written with the female (pod) parent first, with a multiplication sign in between:
Pod Parent × Pollen Parent
In nature, what normally happens is that the pollinator (such as an insect) will land on the labellum and crawl towards the back of the lip in search of nectar. They will disturb the anther cap and collect pollinia in the process (there is a small sticky tab at the base of the pollinia which gets caught on the insect’s back). The pollinator then moves onto the next flower (sometimes on the same plant, sometimes on another plant) and repeats the process, this time with the pollinia getting caught in the stigmatic cavity as it backs out of the throat of the flower.
Some flowers can also self-pollinate in nature; the anther cap may be easily disturbed by the wind and the pollinia will swing around and into the stigmatic cavity, resulting in a “selfing”. In cultivation this often done intentionally if one only has a single example of a species or to bring out recessive traits, such as albinism.
Compatibility and Fertility
It can be disappointing when you have a great idea for a cross and try it, only to find that it doesn’t work! Unfortunately, not all pollinations will result in a seed pod forming. This is determined by compatibility (how compatible are the genes of your chosen parent plants) and fertility (the capacity to which your parent plants can generate viable gametes).
There is a spectrum of compatibility, ranging from an empty pod (if one forms) to a full pod. Many Cymbidium species can be self-pollinated (selfed), but some seem to have poor self-compatibility, such as Cym. lowianum, i’ansonii and tracyanum. Greig Russell discusses this subject in more detail in his article on self-incompatibility.
This issue of compatibility extends to hybrids as well. Some crosses simply fail to take, despite both parents being fertile. Sometimes a cross will only work in a certain order, i.e. (Plant A × Plant B) may be successful, but (Plant B × Plant A) may not be.
Cym. floribundum is interesting in that many of its genes do not line up well with those of other members of the genus (in other words, the chromosomes are not homologous with the majority of Cymbidium species). This mismatch results in limited or no fertility in many hybrids involving the species, particularly diploid primary hybrids (the cross of two species). Another example is my diploid plant of Cym. Memoria Geoff Laird (madidum X lowianum), which does not appear to produce viable pollen yet is pod fertile (though many crosses with it still fail or produce very little seed).
Ploidy
The next factor to consider is ploidy. This is the number of sets of chromosomes in a cell, typically referred to by the letter n. In nature, all Cymbidium species are diploids (2n); that is, they possess two sets of chromosomes, one from each parent. Occasionally higher ploidies (called polyploids) can occur naturally, as in the case of the famous Alexanderi ‘Westonbirt’ (a tetraploid, or 4n). Ploidy is further explained in this article.

Typically, though, polyploids must be created in the lab using mutagens such as colchicine or oryzalin to artificially double the number of sets of chromosomes. Most plants the average grower will encounter will be one of three ploidies:
- Diploid (2n)
- Triploid (3n)
- Tetraploid (4n)
Most modern hybrids are tetraploids, which are favoured due to their increased size and substance – they usually have larger and thicker flowers, foliage and roots, although there are exceptions to this rule.
Tetraploidy also has the advantage of restoring or improving fertility in otherwise incompatible crosses; hybrids that have poor fertility as diploids (e.g., Cym. Peter Pan) will successfully breed when converted to tetraploids.
Triploids, on the other hand, can be difficult to work with. They often have increased vigour and resilience but are almost always pollen sterile and have limited fertility as pod parents. The offspring can be a mixed bag, too, varying between diploids, triploids, tetraploids and aneuploids. Aneuploids have either missing or extra chromosomes and are often poor growers; few do well. Cym. Girrahween ‘Enid’ is one of the few known aneuploids to be awarded.
In general, it is advisable to keep ploidy consistent: cross diploids with diploids and tetraploids with tetraploids. Diploid crosses should be treated at the lab so that the grower has a range of diploid and tetraploid seedlings to choose from, as this offers flexibility in the next generation. Other approaches are possible, but that is outside of the scope of this article.
Choosing Parents
It is easy to get carried away and start making crosses between any two plants that you like – most growers that have dabbled with hybridising have probably done that early on and then realised later that their cross wasn’t going to be as successful as they had hoped. Consider what traits you are looking for in the offspring, such as:

- Flower colour and patterns – do you want spots and stripes? Solid colours? Albas/pure colours? Splash or brushmark patterns?
- Flower count – how many flowers do you want on a spike?
- Flower life – how long should the flowers last?
- Flowering season – when do you want it to bloom?
- Cutting ability – do you want to be able to cut the spikes for floral displays?
- Spike habit – upright, arching or pendulous?
- Spiking behaviour – are you aiming for multiple spikes off a bulb at once, or repeat spiking where the same bulb produces spikes for 2-3 years in a row?
If you take a little bit of time to work out what you would like to create, then select your parent plants based on their potential to reach your goal, you will probably be a lot more satisfied with the outcome. It can be hard to assess what you might get from a given parent plant, so looking at other crosses involving it (or its parents) can help give you an idea of the traits it may pass on to its offspring.
Pollinating Flowers
Once you have selected your two parents, the first step is to harvest the pollen from the intended pollen parent.
Sometimes there is little choice as to which plant will be used as the pod or pollen parent due to different flowering times or limited access (for example, another grower may have shared pollen with you).
A pair of tweezers can be used to collect the pollen. First, sterilise them thoroughly (e.g., flaming and allowing them to cool). Afterwards, carefully pull the anther cap off to reveal the pollinia (note that for small blooms, sometimes the pollinia can detach with the anther cap, resulting in the fiddly job of extracting it!).
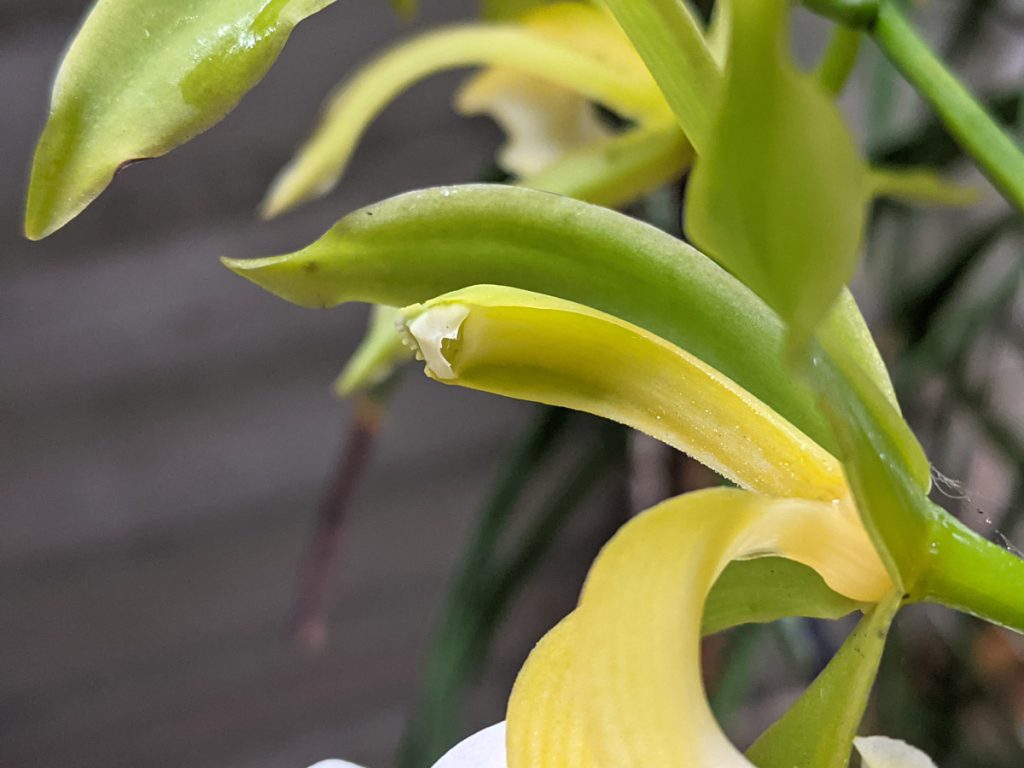
Gently pull the pollinia off the end of the column, taking care not to tear the stigmatic cavity in the process. Normally a small tab will accompany the pollinia, leaving a notch in the end of the column (as shown in the photo). Sometimes the pollinia will detach individually as well.
If the intended pod parent is not yet in bloom, pollen can be stored in the fridge (the crisper drawer is a good spot). A small test tube or similar container will do; just make sure it is easy to identify which plant it belongs to!
Depending on the plant and storage conditions, pollen can last up to two years in the fridge. Smaller pollinia tend to lose viability sooner, especially as the outer casing of the pollinia hardens.
There are mixed views about whether to remove the pollinia from the intended pod parent. For plants where the anther cap is easily dislodged, it is certainly advisable to do so to avoid a self-pollination.
However, there are reports of a few species (e.g., Cym. devonianum) that only work as pod parents if the anther cap remains undisturbed. It may also be beneficial to leave it where the pod parent is much larger than the pollen parent and additional time may be required for fertilisation to take place (as the flower will start to senesce, or rapidly age and collapse, once the anther cap is disturbed).

Some hybridisers will also remove all the tepals and labellum, leaving just the column on the blooms that they pollinate. However, others recommend leaving the labellum in place, as it may serve as a source of sucrose during its post-pollination senescence. My personal approach is to leave the flower alone until the tepals and labellum begin to die off.
Once the pod parent flower is ready, prepare the pollen. Depending on the cross and the relative size of the parent plants, you may need to use multiple pairs of pollinia or just one pollinium.
I use a cotton tip that has been moistened with room-temperature water to pick up the pollen; the moisture helps to keep it on the cotton tip after it has dried out somewhat in the fridge (fresh pollen is usually sticky enough that you can use a toothpick, although I am always careful to cup my other hand under it just in case I drop it!).
For aged pollen, advice I have received is to try crushing the pollinia and use a small drop of honey on a toothpick to transfer it into the stigmatic cavity.
Gently pull down the labellum enough to allow you access to the stigmatic cavity with the toothpick or cotton tip. Usually, you can gently press the pollinia into the cavity and it will stick, although if you are using honey, it may be easier to “wipe” the pollen off towards the side of the stigmatic cavity.

In the weeks following pollination, you should see some changes occur. The flower will start to turn downwards, although this is no guarantee of successful fertilisation.
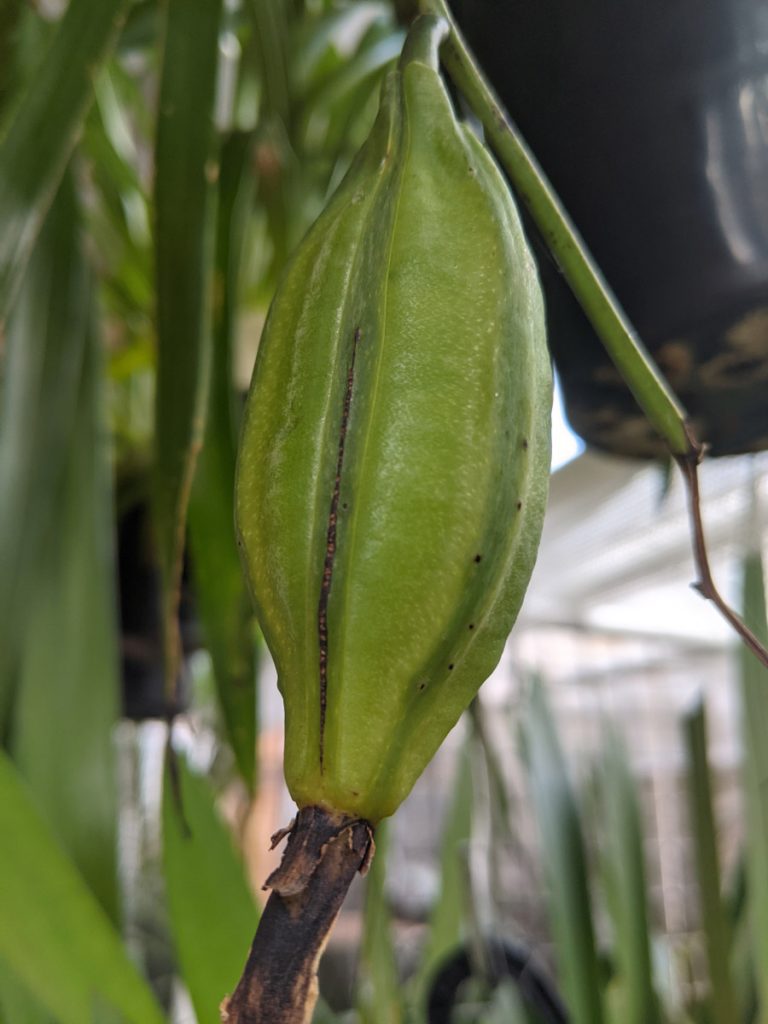
If the pollen successfully germinated, you should observe the column swelling as the pollen tubes makes their way to the ovary. Fertilisation then occurs and the ovary will start to swell to form a seed pod.
It is important to keep the plant protected as the seed pods develop, as heat and direct sun can result in seed pods aborting. Some plants are more sensitive to environmental changes than others, too – for example, Cym. changningense ‘Annalie’ seems to be highly sensitive to temperature fluctuations during pod development.
It takes about a year for most Cymbidium seed pods to reach maturity and naturally split open (dehisce), although there are notable exceptions (such as Cym. atropurpureum).
In most cases, the seed pods can be harvested at about 7 months (8 to 9 is recommended for Cym. madidum and its immediate progeny) and sent to a lab for processing. At this point, the seed has matured enough that good germination is possible in the lab.

Ideally seed pods should be sent before they dehisce, as this way they can be opened under sterile conditions in the lab. If working with a seed pod that has opened, allow the seed to dry and send it to the lab; it can be germinated, but often a percentage of seed will be destroyed by the sterilisation process required to prevent contamination of flasks.
Cymbidium seed is best raised in a sterile environment, as like most orchids it lacks endosperm (the food supply found in many seeds). This light weight enables seed to be carried by air currents and is why orchids generally produce thousands of seeds in nature, as only a few will find the right conditions to germinate and mature.
Modern seed-raising processes use sterile flasks with a nutrient-rich medium for seed germination; it is important to keep these sterile, as fungi and other invaders also enjoy the nutrients and will out-compete the tiny Cymbidium protocorms.
Normally around 6 months after processing, the lab will be able to provide a report on how much seed germinated and an estimate of the number of seedlings. At this stage you will need to decide how many flasks of the cross you want and whether to have diploid crosses treated to induce tetraploidy.
It can be another 6-9 months after germination before the seedlings are ready to deflask and send, depending on how vigorous the cross is. Additionally, treatment with colchicine slows the early development considerably, so you may be waiting 9-12 months from the germination report before receiving your seedlings.
Finally, once you have your seedlings, you can expect to see flowers anywhere from 2 to 5 years later – it really depends on the cross and your growing conditions.
